1.If the employee's profile is not already open, go to Settings> People> Employees ![]() and double-click the employee's name to open it.
and double-click the employee's name to open it.
2.Click the Jobs tab.
|
Caution Do not change settings on the Jobs tab while the employee is clocked in. |
|
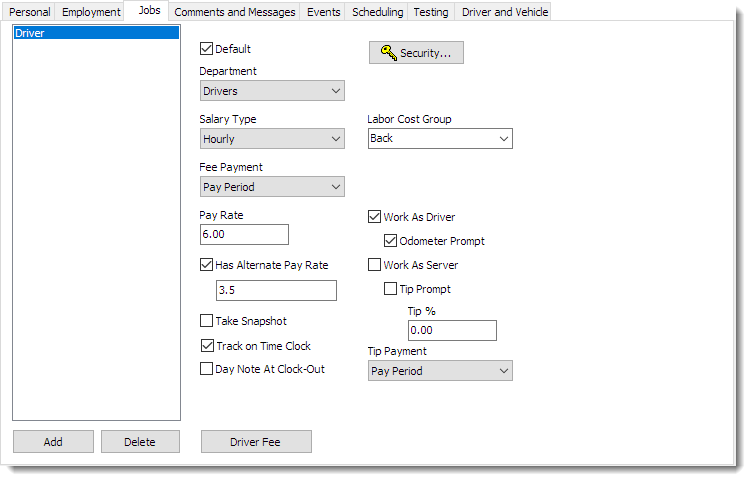
Note The options that appear on the Jobs tab will vary, depending on whether they are set by Employee or Department (see Choose Settings to Apply by Department for details). The image below shows all possible settings; ignore any settings not shown on your store's Jobs tab. |
3.To add a new job:
a.Click the Add button to display the New Job Name window.
b.Select the employee's job from the Name drop-down list. If the appropriate job name is not listed, see Set Up Employee Jobs to add it, and then use the link to return to this tutorial.
|
Hint One employee can have as many jobs as required, for example working as a driver some shifts, and a cashier or assistant manager on other shifts. |
c.Click OK to close the New Job Name window.
4.If the employee has more than one job name, click to highlight the primary job and then select the Default check box to identify that job name, and the related department, as taking priority over any others. See an example... An employee who works as a driver, with one pay rate and an Assistant Manager with another pay rate would require two jobs. The assistant manager job would be chosen as the default to enable increased secrity privileges.
|
Note Security privileges will be assigned to the employee based on the job name you set as the default (and its associated department). |
5.If the default department is not correct, select the appropriate department from the Department drop-down list. The employee will inherit all settings for that department.
6.Set the employee's pay (this information will be used to calculate a daily labor cost for salaried employees in the labor cost sections of the Day Report):
a.In the Salary Type list, select the time period that the pay rate will apply to.
|
Note Bi-Weekly and Twice Monthly pay periods are not the same: bi-weekly salaries are paid every 14 days, while twice-monthly salaries are paid twice each month on specific dates. Pay dates for twice monthly salaries are set on the Employee Options Pay Period screen. See Set Up Pay Periods. |
b.In the Pay Rate field, enter the dollar figure that is earned in the selected salary type time span.
See an example... [If the employee is paid $7.00 per hour, select Hourly as the salary type, and then enter 7 in the Pay Rate field.]
7.Change or select any other job settings that appear on this tab as required. To see a description of each setting that may appear, click it in the image at the top of this topic.
8.If the employee you are adding is a driver, fill in the Driver and Vehicle tab. See Track Driver Insurance and License.
9.Click OK to save all changes to the employee's profile. Your new employee now has access to Terminal and will appear in Store Manager.
You have now completed the Add an Employee SpeedStart Tutorial. 
Next Steps
•Follow the Scheduling SpeedStart Tutorial to find out how to the Scheduling tool to help you schedule employees more efficiently.
•Add an Employee Tutorial Home
•Step 1: Enter Personal Information
•Step 2: Enter Employment Information
• Step 3: Select Employee Skills
• Step 4: Set Employee Availability
You are here  Step 5: Assign Job and Salary
See Also:
•Additional SpeedStart Tutorials 


