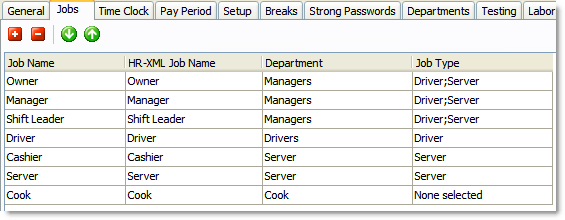
The Jobs tab allows you to match job names with a department, so that when you assign a job to an employee, the matching department will be automatically set. This is important, because the department an employee belongs to normally determines the employee's security privileges.
If you are importing employee information using HR-XML (.hrx) files, the Jobs tab is where you map SpeedLine job names to the equivalent HR-XML job names.
To Add or Change a Job
1.Go to the Settings> People> Employee Options ![]() > Jobs tab.
> Jobs tab.
2.If you are adding a new job, click the Add button.  A new row appears in the list.
3.In the Job Name field, type the new job name.
4.In the Department field, choose a department that employees with that job name will usually belong to.
|
Hint You can change the department assigned on the employee profile later, if needed. |
5.Other columns may appear in the Jobs list, depending on your store's setup. Click the columns in the image below to see a description of each.
6.When finished entering settings, on the Edit menu, click Save Changes. Now when a job is added to an employee's profile, the department (and associated security privileges) will be automatically assigned.
Back to the Add an Employee SpeedStart Tutorial> 
To Delete a Job
1.Go to the Settings> People> Employee Options ![]() > Jobs tab.
> Jobs tab.
2.In the list, click the job name you want to remove.
3.Click the Delete button. 
|
Note If you delete a job, it will no longer be available for assignment to employees, but it will not be deleted from current employee records. |
4.Click OK to confirm the removal of the job from the list.
5.On the Edit menu, click Save Changes.
See also:


