1.If the employee's profile is not already open, go to Settings> People> Employees ![]() and double-click the employee's name to open it, then click the Scheduling tab.
and double-click the employee's name to open it, then click the Scheduling tab.
2.In the Not Available Times area, double-click the first day you want to set, or highlight it and click the Change button.
|
Note The Not Available Times area may also be called the Available Times area, depending on the Availability Settings option that is chosen in the Scheduling Options> General tab. See Change Availability Settings for instructions on changing the setting. |
3.In the Future Changes area, click Current.
4.Click the central Add button. 
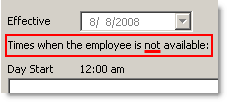
5.Determine whether you are specifying times when the employee is not available or times when the employee is available by noting the caption above the Day Start area.


6.In the Start Time field, enter the start time of the period the employee will not be available for work that day (or the time the employee is available, if you are entering available times). For example, if the employee starts school at 8, you would enter a "not available" start time of 7am.
7.In the End Time field, enter the time the employee becomes available for work (or the time they employee is no longer available, if you are entering available times). For example, if the employee finishes school at 3, you could enter a "not available" end time of 3:30 or 4 pm.
8.Click OK.
9.Repeat steps 2 to 8 for each day that you want to set availability for.
10.If you are finished entering information for this employee, click OK to save your changes and close the employee profile; otherwise, continue to Step 5: Assign Job and Salary.
Add an Employee SpeedStart Tutorial 
•Add an Employee Tutorial Home
•Step 1: Enter Personal Information
•Step 2: Enter Employment Information
• Step 3: Select Employee Skills
You are here  Step 4: Set Employee Availability
•Step 5: Assign Job and Salary
See Also:
•Additional SpeedStart Tutorials 


