To maintain the accuracy of Inventory reports, you will need to perform regular physical counts of your stock. The following links provide information on how to use Inventory Count batches. The steps in creating a count batch are listed below. Click the links to see the procedures.
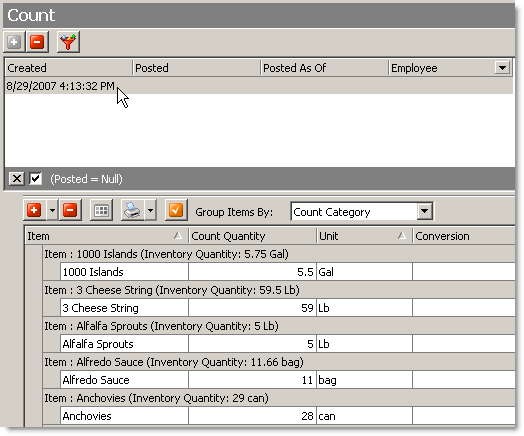
a)Go to Settings> Inventory> Count.  b)In the Count window, click the Add button  at the top of the screen. This will add a new count batch. The date and time the batch was added will be displayed. at the top of the screen. This will add a new count batch. The date and time the batch was added will be displayed.

|
Important Inventory only allows one open (unposted) count.
|
|
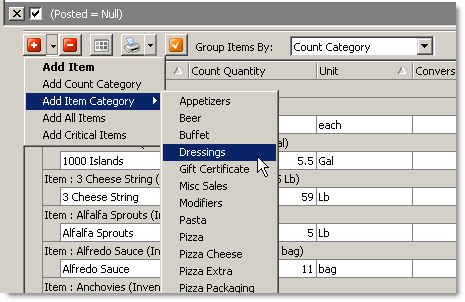
a)Go to Settings> Inventory> Count.  b)In the Count Edit pane, click the drop-down arrow beside the Add button  to add stock items to a count batch. Use one of the following options: to add stock items to a count batch. Use one of the following options: •Add Item: Use this option to add items one at a time. Click to add one blank line to the count, select the Item field and then use the drop-down arrow to select from the list of stock items shown. •Add Count Category: Select this option to add all of the items in a particular . •Add Item Category: Select this, and then select the category, to add all of the items that have that Item Category selected in the General tab of the Stock Items screen. •Add All Items: Select to add all of the active stock items to this count. Items are sorted alphabetically by Item or Count Category. •Add Critical Items: Select to add only those stock items designated as critical items (usually more expensive or theft-prone items) in the Stock Items General tab. c)On the Edit menu, click Save Changes.
|
The Count List is a worksheet used when physically counting your stock items. These stock counts are then entered into Inventory.
a)Go to Settings> Inventory> Count.  b)In the Count pane, click an open count to select it. (If you do not have an open count, add a count batch using the instructions in the Add a Count Batch and Add Stock Items to a Count Batch links above.) c)If your items are grouped into , in the Group Items By list, select Count Category. d)Click the drop-down button beside the Count List button,  and then click one of the Print Count List options. The Report Options wizard opens. and then click one of the Print Count List options. The Report Options wizard opens.

|
Note Most of the settings are already picked for you. However, if you want to customize the list, for example by sorting by PLU, or by showing the value or expected quantity, click the Back button and follow the instructions.
|
d)Click Finish on the Report Options Wizard window.
e)Click the Print button (1) to print this report from the Print Preview screen. Click the Close button (2) when your printing is complete. |
•Take physical inventory of your stock items and record quantities on the count list you printed. |
a)Go to Settings> Inventory> Count.  b)Click an open count in the list. Each item in the count batch, and its expected quantity, are shown. 

|
Note If a negative quantity is shown for some items, ensure all receive and adjust batches are posted before posting the count.
|
c)For each item you counted, click the Count Quantity field and enter the physical count you recorded on the count list.

|
Hint If you wish to record that an item is out of stock, enter a "0" (zero) instead of leaving the Count Quantity blank. A blank quantity means that there is no change from the expected amount shown.
|
)If the unit of measure counted is the not same as the expected unit shown, change the UOM (Unit Of Measure): click on the Count UOM field and make your selection from the drop-down list.

|
Note An item can have multiple count UOMs. To add a new unit, in the Settings> Inventory Settings> Stock Items> Count Units tab, enter the new unit for that stock item. Then, use the Custom Conversions tab to add a conversion that will display in the Conversion column of the Count details pane for that counted item.
|

|
Notes
-To show or hide posted Counts, click the Filter  button. button.
-To display the Per Unit Cost column, click the Show Value in Count button.  This feature is only available when performing the first count for a store. This feature is only available when performing the first count for a store.
|
|
When all of the above steps are complete and all receive, transfer, and ideal usage batches have been posted for the period, you are ready to Post the Count Batch.
See Also:
•Correct Count Mistakes
•Post a Count Batch
•Add Stock Counting Units
•Add or Change Stock Count Locations
•Export Reports


 button.
  This feature is only available when performing the first count for a store.