1.Go to the Today> Operations Planning> Scheduling ![]() > Weekly Schedule tab. The rows on this table may be reordered by clicking the column titles or the small arrows at the top of some columns.
> Weekly Schedule tab. The rows on this table may be reordered by clicking the column titles or the small arrows at the top of some columns. 
|
Note If the start and end days or shift time increments of the default schedule do not suit your operation, they may be changed. See Change Time Preferences and Grid Size. |
2.To select employees for scheduling, do one of the following:
•To choose employees by name, click the top of the employee name column to order this column alphabetically.
-or-
•To choose employees by job, click the top of the column listing job types to group employees by job type.
-or-
•To choose employees by skill, right-click anywhere on the schedule, point to Highlight Skills, and click the skill you want to highlight.
|
Note To highlight employee skills, in the Settings> People> Scheduling Options tab, you must have Use Skills selected, and there must be at least one skill listed. |
3.Click opposite the employee's name under the day you are scheduling the employee for, and enter the shift start and end times by doing one of the following:
•Type the short forms described in the table below directly into the field.
To Enter This Shift: |
Type This Short Form (without spaces): |
9 am to 5 pm |
9a-5p |
2 pm to 10 pm |
2p-10p |
11:45 am to 3:45 pm |
11:45a-3:45p |
11 am to 11:30 pm |
11a-11:30p |
10 am to 2 pm, and 4 pm to 8 pm (split shift) |
10a-2p,4p-8p |
|
Note Noon is entered as 12p, and midnight as 12a. |
-or-
•Click the drop-down arrow  and then click the Add button
  to add a new shift. Use the arrows
  to adjust the start and end times for the shift.
4.Click outside the table. The new shift times are entered.
5.Repeat steps 3 and 4 to schedule additional employees.
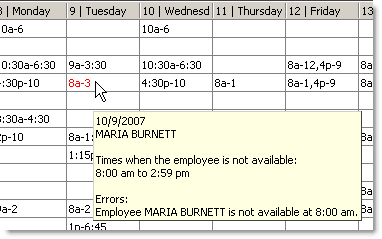
6.Red text indicates that an employee is not available. Hover over the red text to see an explanation.

|
Hint To review or change an employee's setup information (including availability times on the Scheduling tab), right-click on the employee's name and select Employee Setup. |
7.If an employee is unavailable, change the start and end times, or click the field to select the times and press the DELETE key to delete the shift.
8.Enter shifts for the remaining days of the week, or copy the schedule to another day and modify it as needed.
9.Click the Daily Schedule tab and then at the bottom of the screen, click the Schedule Errors tab to see if there are any scheduling errors indicated.
|
Hint To jump to the daily schedule, select any of the entries for that day, and then click the Daily Schedule tab. |
Scheduling SpeedStart Tutorial 
• Step 1: Enter Labor Overhead
•Step 2: Set Labor Goals
You are here  Step 3: Enter Employee Shifts
•Step 4: Publish or Print the Schedule
•Step 5: View the Weekly Summary


