You can add delivery zones to specify if and when deliveries can be made to each region of your trade area, what charges and fees paid to drivers apply, and how the quoted time should be adjusted. Delivery zones are most often used in conjunction with LiveMaps [The LiveMaps optional add-on allows you to base your customer address validation, delivery zones, driving directions, and reporting on live, up-to-date maps provided by an online mapping provider. Display maps on a second monitor, email directions to your drivers' smartphones, and more. Talk to your SpeedLine Sales representative for more information.] or a streets database, which automatically assign a zone to each customer based on street address. See the LiveMaps SpeedStart Tutorial or Manage the Streets Table for more information.
|
Important The steps below assume that a delivery zone field has been added. See Add a Delivery Zone Field to the Customer Screen for instructions on adding a delivery zone. |
1.Go to Settings> People> Delivery Zones. ![]()
2.If you have not yet set a standard delivery start time for your store, in the Standard Delivery Start Time field, do one of the following:
•If charges, fees, or quoted time adjustment will stay the same for all zones throughout the day, leave the Standard Delivery Start Time set at 12:00 AM (midnight).
-or-
•If some zones have fees that change depending on time of day, or if you do not deliver to some zones after a certain time, type or select the earliest time of day your store takes delivery orders.
3.In the top toolbar, click Add button,  and then click Add Zone Master.
4.In the Delivery Zone field, enter a code for the new zone.
|
Important You must enter the delivery zone in the format specified by the Entry Mask field in the Customer Options Zones tab (see Add a Delivery Zone Field to the Customer Screen for an explanation of entry masks). |
|
Important If you are not using LiveMaps [The LiveMaps optional add-on allows you to base your customer address validation, delivery zones, driving directions, and reporting on live, up-to-date maps provided by an online mapping provider. Display maps on a second monitor, email directions to your drivers' smartphones, and more. Talk to your SpeedLine Sales representative for more information.] to assign delivery zones based on a customer's address, but instead assigning zones using a streets database purchased from a third-party vendor that includes zones, the delivery zones you enter here must match those in the Zone column of the Streets screen. See Manage the Streets Table for information on that screen. |
5.If using LiveMaps [The LiveMaps optional add-on allows you to base your customer address validation, delivery zones, driving directions, and reporting on live, up-to-date maps provided by an online mapping provider. Display maps on a second monitor, email directions to your drivers' smartphones, and more. Talk to your SpeedLine Sales representative for more information.], choose a zone boundary color to distinguish this zone from others on the map.
|
Hint If using LiveMaps, zone boundaries can overlap. If there are certain areas closer to the store that you want to have a higher delivery charge than areas further away (for example, because they are considered high-risk neighborhoods), add those zones first during zone setup to ensure they are assigned to customers whose address may fall in more than one zone. |
6.Click OK to add a master zone. The Add Zone Detail window opens.
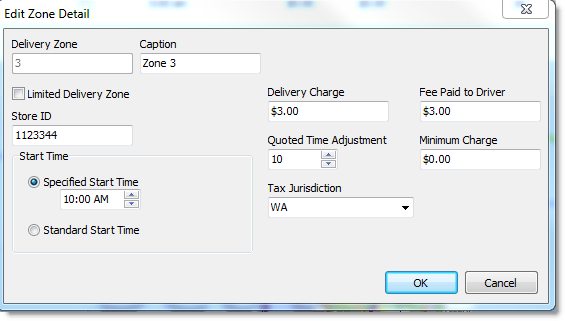
7.Enter the properties (charges, fees, and so on) for the zone. Click the image below to see an explanation of each setting.
8.After entering the properties for the new zone, click OK. The new zone master and zone detail are shown in the list.
9.Do one of the following:
•If the delivery charge, fees paid to drivers, minimum charges, quoted time, or store ID for deliveries to the zone will not change based on time of day, you have finished adding the zone; add further zones if required. If you are using LiveMaps, see Define Delivery Zone Boundaries for steps to specify the boundaries of your new zone.
-or-
•To automatically change the charges, fees, or quoted time adjustment for deliveries to the zone at a certain time of day, you must add a second zone detail entry for the master zone with a different caption and start time:

a.Click the master zone (for example, Delivery Zone:1) to select it.
b.In the top toolbar, click the Add button,  and then click Add Zone Detail.
c.In the Caption field, enter a name for this zone, for example, "Zone 1 Evening."
d.In the Specified Start Time field, type or select the time that changes in charges, fees, or quoted times will come into effect.
e.Change the settings as required. See the clickable image above for an explanation of each setting.
-or-
•To restrict deliveries to the zone to only certain times of day without a manager override, see Restrict Delivery Times for a Zone.
Back to the LiveMaps SpeedStart Tutorial - Define Delivery Zones >
See Also:
•To Draw Delivery Zone Boundaries (if using LiveMaps)
•Restrict Delivery Times for a Zone
•Change Delivery Zone Times or Fees
•Print, Export, or Customize Streets or Zones Tables
•Add a Delivery Zone Field to the Customer Screen
•Warn When Zones Are Assigned to Other Stores
•Apply Taxes by Delivery Location
•Add or Change a Minimum Charge
•Edit Order Type General Options (Quoted Time)


