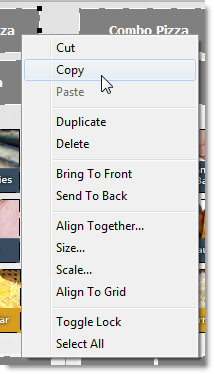
The Panel Designer shortcut menu (or "right-click menu") can be used to align, size, move, and copy or delete panel components (An element that can be placed on a menu panel using the components toolbar in Panel Designer. Some components, for example simple item buttons, are linked to items in your menu. Other components, for example quantity or size buttons, are linked to information in the Root Menu tabs. There are also components, for example titles and background shapes, that are not linked to menu information.) quickly.

Panel Designer shortcut menu.
Menu Command
|
Function
|
Cut
|
Deletes selected component and copies it to the clipboard.
|
Copy
|
Copies the selected component to the clipboard.
|
Paste
|
Pastes the component on the clipboard to the panel that is right-clicked.
|
Bring to Front
|
Moves the selected component to the top layer of the panel, above other components. You can use Bring to Front to position buttons on top of a background shape.
|
Send to Back
|
Moves the selected component to the bottom layer of the panel, below other components.
|
Align Together
|
See Space or align a group of panel components below.
|
Size
|
See Size a group of panel components below.
|
Scale
|
See Scale panel components below.
|
Align to Grid
|
See Align components to the panel grid coordinates below.
|
Toggle Lock
|
Locks or unlocks the position and size of a panel component to prevent unintentional changes. See Lock or unlock panel components below.
|
Select All
|
Selects all components on the panel.
|
Click the links below to view instructions for additional shortcut menu procedures:
The Panel Designer has an invisible underlying grid. Panel components will automatically snap to the grid unless they are moved one pixel at a time using keyboard shortcuts.

Panel Designer workspace with grid visible.
1.Select the component in the Panel Designer workspace. 2.Right-click and select Align to Grid from the shortcut menu. If the component is not already aligned with the grid, it will snap to the nearest grid coordinates. |
1.Position the first and last buttons in the group approximately where you want them. 2.Select the group of components in the Panel Designer workspace. 3.Right-click and select Align Together from the shortcut menu to display the Alignment window. 4.Select the appropriate settings to align or space the components as described in the table below.
To
|
Select this in the Horizontal area
|
Select this in the Vertical area
|
Space a vertical column of buttons equally
|

|
No Change
|
Space Equally
|
Space a horizontal row of buttons equally
|

|
Space Equally
|
No Change
|
Align the tops of a horizontal row of buttons
|

|
No Change
|
Tops
|
Align the left side of a vertical column of buttons
|

|
Left Sides
|
No Change
|
Align the centers of a horizontal row of buttons
|

|
No Change
|
Centers
|
Align the centers of a vertical column of buttons
|

|
Centers
|
No Change
|
Center a group of buttons horizontally in the window
|

|
No Change
|
Center in window
|
Center a group of buttons vertically in the window
|

|
Center in window
|
No Change
|
|
1.Select the group of components in the Panel Designer workspace. 2.Right-click and select Size from the shortcut menu. The Size window appears. 3.Select the appropriate settings to size the components as described in the table below.
To
|
Select this in the Width area
|
Select this in the Height area
|
Specify dimensions for a component or group of components
|
Width (and enter width in pixels)
|
Height (and enter height in pixels)
|
Make all components in a multi-sized group the same size as the biggest member
|
Grow to largest
|
Grow to largest
|
Make all components in a multi-sized group the same size as the smallest member
|
Shrink to smallest
|
Shrink to smallest
|
Make all components in a multi-sized group the same width as the narrowest member
|
Shrink to smallest
|
No Change
|
Make all components in a multi-sized group the same height as the thinnest member
|
No Change
|
Shrink to smallest
|
Make all components in a multi-sized group the same width as the widest member
|
Grow to largest
|
No Change
|
Make all components in a multi-sized group the same height as the tallest member
|
No Change
|
Grow to largest
|
1.Select the components in the Panel Designer workspace. 2.Right-click on and select Scale from the shortcut menu. The Scale Percent window appears. 3.Enter the desired percentage increase in size (> 100%) or decrease in size (< 100%), and then click OK. |
|
1.Select the components in the Panel Designer workspace. 2.Right-click and select Toggle Lock from the shortcut menu. Gray squares at the edge of the component indicate that it is locked. 
Locked components cannot be moved or sized using the mouse; however, locking does not prevent changes made using the Components Property Editor.
|

|
Note You can also use the shortcut menu to permanently delete or copy buttons. For more information on copying buttons, see Copy a Button.
|
See Also:
•Panel Designer Keyboard Shortcuts
•Position Panel Components
•Delete a Button
•Copy a Button


