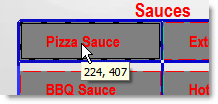
1.Open the panel in Panel Designer, and then select the component (An element that can be placed on a menu panel using the components toolbar in Panel Designer. Some components, for example simple item buttons, are linked to items in your menu. Other components, for example quantity or size buttons, are linked to information in the Root Menu tabs. There are also components, for example titles and background shapes, that are not linked to menu information.) or group of components to be moved in the Panel Designer workspace.
2.To adjust the button placement on the panel, use one of the following methods:
-or-
3.To change the button position in relation to objects on other layers, right-click on the button and select Bring to Front to bring the button above other objects, or Send to Back to send it behind other objects.
|
Hint You can also use keyboard shortcuts to move panel components. |
3.On the File menu, click Close to close the Panel Designer.
4.Save the menu file and refresh Terminal to see your changes.
|
Hint Position commonly-used components like the ticket display, quantity buttons, and size buttons in the same place on every screen to improve the order-taker's speed and accuracy. |
|
Note The position of the column of buttons that link to other menu panels is controlled in Store Manager. See the Store Manager Help topic Move Menu Page Buttons for more information on positioning, or removing, the menu panel buttons. |
See Also:

 displays the position (left, top) as you drag.


