
The Language Filter prevents offensive words from being displayed on screen or printed on tickets by replacing them with asterisks or blank spaces. It can protect you from embarrassment and loss of customers due to employees accidentally entering profanity in printed customer comments.
To Enable and Set the Language Filter:
1.Go to the Settings> System> Language Filter ![]() > Options tab.
> Options tab.
2.Select Enable Language Filter to activate this feature.
3.Select Log System Event if you want word filtering events (including the station and employee ID triggering the filter) to be reported in the System Events report.
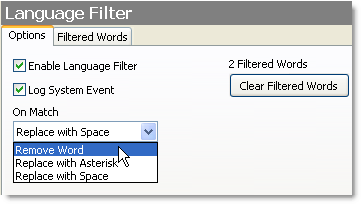
4.In the On Match list, select how you want the Language Filter to react when it finds a match:
•Remove Word: removes the word from the sentence.
•Replace with Asterisk: replaces the offending word, or partial word, with asterisks.
•Replace with Space: replaces the offending word, or partial word, with blank spaces.
|
Note If set up previously, the Filtered Words tab may list offensive words. To clear the Filtered Words list without actually viewing the list, click the Clear Filtered Words Button. |

5.Click the Filtered Words tab.
6.Click Yes to the warning message.
7.In the Pattern Match Words column, enter any text pattern that you do not want printed on customer tickets or displayed in Terminal. Any word containing this pattern of letters will be filtered, so enter only words containing letter combinations not likely to occur in normal language.You may not want the filter to change the delivery note "Watch out for the vicious shitzu" to "Watch out for the vicious ".
8.In the Word Match Words column, enter any full words that you do not want printed on customer tickets or displayed in Terminal. Variations on these words (for example, plural forms) will not be filtered.
9.On the Edit menu, click Save Changes.
See also:
