In order to track the usage of your stock items in SpeedLine Inventory, they need to be identified and given an initial stocking Unit of Measure (UOM). By using the Inventory wizard, you can select which of your stock items are to be included in Inventory and set their initial stocking UOM easily.
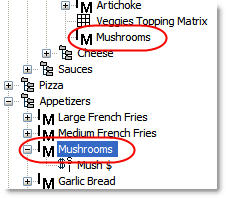
Some menus may contain duplicate modifiers—modifiers with the same name, but different PLU numbers. If these duplicates actually refer to the same stock item, they must be merged so that they appear on Inventory count lists and reports only once. Follow the To Find and Merge Duplicates procedure below to merge any duplicate items you detect when running the Inventory wizard.
What to Include
The only items included in Inventory should be stock items that you buy from suppliers and stock on shelves or in coolers. In other words, you would not include finished pizzas or subs, but only the stock items used to make them.
To Select Items to Track with the Inventory Wizard
1.Right-click the Menu Root  , point to Wizards, and then click Inventory Wizard.
2.Click Next.
3.In the list on the left, navigate to each item that you have decided to track in Inventory, select it, and then click the Add button. If you want to remove an included item, select it in the list on the right and click the Remove button. When you are finished adding items, click Next.
|
Note If you see duplicate item names as you are adding items, cancel the wizard, merge the duplicate items (see procedure below), and then run the wizard again. |
4.Select the initial unit of measure for each item by clicking on a field under the Initial UOM column, and then selecting a UOM from the drop-down list.
5.When each item has an initial UOM selected, click Next, and then click Finish. The initial stocking unit for the items is set, and the Include in Inventory check box for the items is selected.
To Find and Merge Duplicates (If Detected)
1.On the toolbar, click the Find button. 
2.In the Search For field, type the name of the duplicate item.
3.In the Find window, leave the top two check boxes selected and clear the rest.
4.Click OK to initiate the search. Matching entries are listed in a search results pane at the bottom of the screen.
5.Pick one of the listed items to be the main entry. This item should be located in the "Modifiers" or "Stock Items" group.
6.Double-click the entry in the search results window to be taken to its location in the Menu Tree.
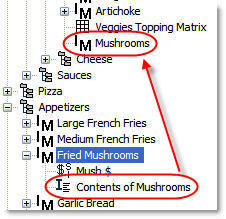
7.Add the main entry as the item contents of the duplicate entry:
a.In the Menu Tree, right-click the duplicate entry, point to Add, and click Item Contents.
b.Click the Contents tab.
c.Right-click in the blank area and click Add.
d.Beside the Item/Modifier field, click the browse button 
e.Select the main entry in the list and click OK.
|
Note If you do not see the main entry located in the list, you will need to create a shortcut to the group it is located in. Click Cancel and add a shortcut from the duplicate entry group to the group containing the main entry (see previous tutorial step for instructions). |
f.Click OK again to close the Edit Content window. The duplicate entry has now been "merged" with the main entry.
8.Repeat steps 5-7 if the duplicate occurred in more than two places in the menu tree.
9.On the toolbar, click the Check Menu button  to make sure errors were not introduced by the merge.
Menu Setup for Inventory SpeedStart Tutorial 
•Menu Setup for Inventory SpeedStart Tutorial Home
•Step 1: Decide Which Items to Track
•Step 2: Record Recipes
•Step 3: Turn on Inventory and Define UOMs
•Step 4: Add Non-Sale Items
•Step 5: Add Shortcuts
You are here  Step 6: Select the Items and Modifiers to Track
•Step 7: Add Recipes (Item Contents)
•Step 8: Add Packaging to Delivery Items
•Step 9: Add Topping Matrixes


