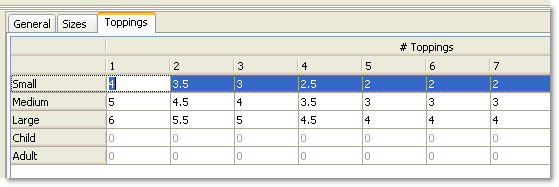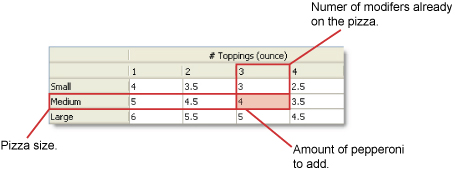
If a stock item can be used as a modifier of an item you sell (for example, a ranch dressing modifier on a green salad item), it is not included in the item contents of that sold item (because not everyone will choose it) and will require a topping matrix. A topping matrix records, for example, that 5 oz. of pepperoni is used on a large 1-topping pizza, while only 3 oz. goes on a large 3-topping.
If you allow modifiers (A Modifier is a choice that is applied to a menu item, such as a pepperoni topping on a pizza.) to be added to your menu items, you need to add a Topping Matrix to each modifier node. ![]()
To Add a Topping Matrix to a Modifier:
1.In the Menu Tree, right-click the modifier node ![]() , point to Add, and then click Topping Matrix.
, point to Add, and then click Topping Matrix.
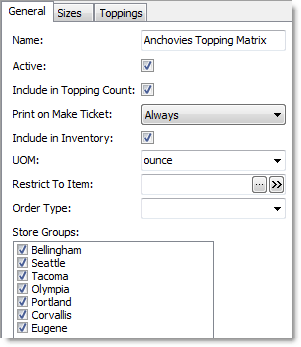
2.Adjust the settings of the General tab. (See clickable image below.)
3.Click the Sizes tab.
4.If the amount of modifiers to include in a menu item depends on the size of the item, select the Sized check box, and then select the applicable sizes.
5.Click the Toppings tab to display the toppings table. The toppings table lists the modifier amounts to add to a menu item.

6.Fill out the table with each amount of modifier that is added to a menu item, based on the number of existing modifiers. If the Sized check box is selected in the Sizes tab, the table will have one row for each size. Otherwise, it will only have one row. Each column represents the total number of toppings already on the menu item.
The new Topping Matrix node ![]() appears under the node you selected in the Menu Tree.
appears under the node you selected in the Menu Tree.
7.If the modifier can be applied to more than one type of item (for example, a cheese topping that can be applied to pizzas or sub sandwiches) create a separate topping matrix for each type of item or group, and use the Restrict To Item setting to specify where the matrix is applied.
Menu Setup for Inventory SpeedStart Tutorial 
•Menu Setup for Inventory SpeedStart Tutorial Home
•Step 1: Decide Which Items to Track
•Step 2: Record Recipes
•Step 3: Turn on Inventory and Define UOMs
•Step 4: Add Non-Sale Items
•Step 5: Add Shortcuts
•Step 6: Select the Items and Modifiers to Track
•Step 7: Add Recipes (Item Contents)
•Step 8: Add Packaging to Delivery Items
You are here  Step 9: Add Topping Matrixes


