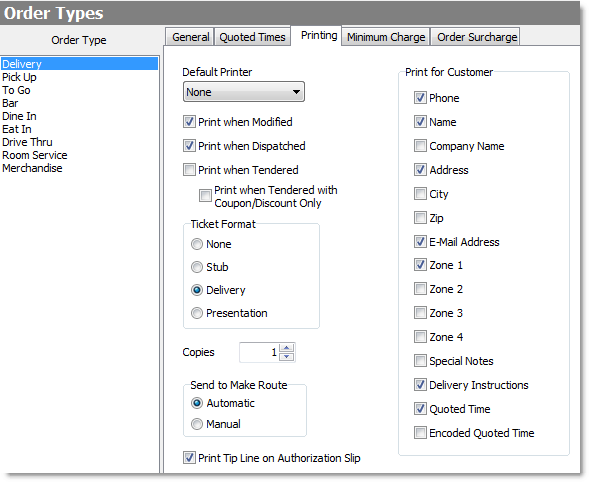
You can specify different ticket printing options for each order type at your store.
SpeedLine tickets are fully customizable. You can customize the following aspects of printed tickets:
•When the ticket prints, to which printer, and how many copies to print (see To Set Ticket Print Options by Order Type, below).
•What pre-set ticket format to use (see To Set Ticket Print Options by Order Type, below).
•What customer and delivery information is typically included on tickets for common order types (see Set Content of Tickets for Order Types).
•The text of headers and footers, and whether customer messages print on the ticket (see Format Printed Tickets).
•The position and highlighting of text on the ticket (see Format Printed Tickets).
•Whether to print labels for an order type (see Print Labels).
To Set Ticket Print Options by Order Type
1.Go to the Settings> Orders> Order Types ![]() > Printing tab.
> Printing tab.
|
Note Select the Order Type on the left before changing settings on the right. |
2.In the Order Types list, select the order type you want to edit.
3.Select the settings for the tickets that will print for the selected order type. Click the settings in the image below to see a description.
|
Important SpeedLine recommends that the Default Printer setting not be set to Print Preview on the primary server [To determine whether a station is the primary server, secondary server, or a work station, log in to Terminal and look at the bottom of the screen, or run WS Config (found on the Start menu under SpeedLine Solutions Inc).] or associated processing station if deferred tickets, kitchen monitors, or Internet ordering are used. The ticket will not fully activate or send to its make routes until the print preview window is manually dismissed from the screen. |
|
Note Store contact information is set in the header or footer (see Format Printed Tickets). |
4.On the Edit menu, click Save Changes.
5.Refresh Terminal to implement your new settings.
See also:
•Set Content of Tickets for Each Order Type
•Add or Change a Minimum Charge


