If you have been recording customer addresses on the Terminal Customer screen, you can print this information on mailing labels to use with direct marketing campaigns. This topic explains how to print mailing labels from Store Manager.
|
Hint If you have Microsoft Excel, SpeedLine recommends exporting the report to Excel and doing a mail merge to print labels, rather than printing directly from Store Manager. This will allow you to screen addresses for incorrect information, and delete duplicate records, before printing. See Export Reports for instructions. |
To Print Mailing Labels
1.Go to Reports> Customer, and click the report you want to run.
2.Click Run Report.
3.Follow the instructions in the Report Options wizard, and click Next until the Format page appears.
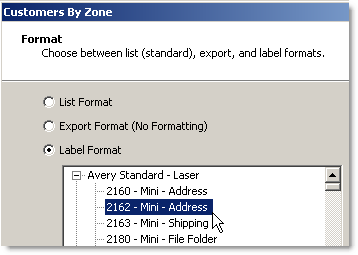
4.Select the Label Format option.
 0
05.Click the Expand button  beside the type of labels you are printing on (check the label package for the size).
6.Select the model of label you are using, and then click Next and follow instructions until the final page of the wizard.
7.Click Finish. A preview of your label sheet will display.
|
Hint If this is the first time you have printed this type of label, you may want to print on plain paper first, to test how well the addresses will align with the labels. If the labels are not aligned correctly, the text position can be adjusted. See To Adjust Label Alignment, below. |
8.Click Print  . The sheet of labels prints.
1.On the Edit menu, click Preferences.
2.Do one or more of the following:
•To shift text position to the right, in the Shift Labels Left/Right field, enter a positive number.
•To shift text position to the left, in the Shift Labels Left/Right field, enter a negative number.
•To shift text position down, in the Shift Labels Up/Down field, enter a positive number.
•To shift text position up, in the Shift Labels Up/Down field, enter a negative number.
3.Click OK.
4.Follow the To Print Mailing Labels procedure above to re-print the labels.
See Also:

