The Prep Items wizard will help you set up menu items, modifiers, and item contents that require advance preparation. The information that you enter in this wizard will be used by Store Manager's Prep Planning function. When you use the Prep Items Wizard, it helps you choose and set up all the items that require advance preparation for use with the Prep Planning tool.
|
Important Before starting this wizard, you must fill in the Prep Parts tab, the Sizes tab, and the Units of Measure tab, which are located in the Menu Root. For more information, see Prep Planning SpeedStart Tutorial (Store Manager). |
To Use the Prep Items Wizard:
1.Right-click the Menu Root  , point to Wizards, and then click Prep Items Wizard.
|
Note Even though it is called the Prep "Items" wizard, item, modifiers, or item contents may all be tagged for advance preparation using this wizard. |
|
Note An item or modifier with a Contents node cannot be included in prep planning, because the item or modifier no longer exists for tracking purposes after it is sold; only the usage of its contents is tracked. |
2.Click Next.
3.In the list on the left, go to each item or modifier that requires preparation, select it, and then click Add. When you are finished adding items, click Next.
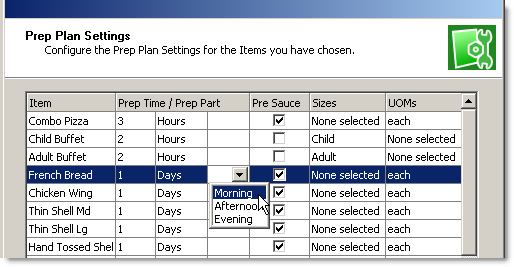
4.The wizard will display the Prep Plan Settings window.

For each prep item listed, perform the following steps:
a.Fill in the Prep Time/Prep Part columns by doing one of the following:
•To specify how many hours it takes to prepare the item and let SpeedLine determine when to prepare it:
i)Type the number of hours of preparation time in the first column and select Hours from the drop-down list in the second column.
ii)The third column will not be active; leave it blank. SpeedLine will determine which prep parts to use, based on the preparation time you have entered and the sales history of the item.
-or-
•To specify how many days it takes to prepare the item and when to prepare it:
i)Type the number of days ahead to prepare it in the first column, and select Days from the drop-down list in the second column.
ii)Select what time of day to prepare the item in the third column.
b.If the prep item requires the addition of a sauce before cooking (for example, pizza shells or baked pasta) select the Pre Sauce check box.
c.If the prep item is sized, click the field under the Sizes column, click the drop-down arrow, and check the appropriate size boxes.
d.If the prep item is not sized, click the UOMs column, and then click the drop-down arrow and select the item's units of measure.
|
Note Select either a size or a unit of measure, not both. |
5.Click Next and then click Finish.
When day end is run in Terminal, your prep items will be included in Store Manager Prep Planning.
See Also:
•Prep Planning SpeedStart Tutorial (Store Manager)

