If you have installed the Above Store add-on, you can use store profiles to capture the Store Manager settings for a store in a named profile, and you can then load settings for different stores into the same copy of Store Manager by switching between profiles. This makes viewing and editing settings for multiple stores easy. Profiles also capture non-Store Manager data, for example, menu or customer information. Click the links below to see instructions for completing each task.

|
Note To use store profiles, you will need the Groups.nx1, Profiles.nx1 and Stores.nx1 tables. If these files are not located in C:\SpeedLine\Data\AboveStore, please contact SpeedLine Support to request them.
|

|
Note Follow this procedure to set up a default template for the head office system that you will use to manage profiles. You only need to do this once.
|
1.On the Above Store menu, click Manage Profiles. 3.Click the Add button  to add an entry. to add an entry. 4.Type Default or Main in the Name field. This profile will hold the settings and data for the head office system. 5.Click the Path field, and then click the Browse  button. button. 6.Navigate to the C:\SpeedLine\Data folder and click OK. 7.Click OK. The default profile will allow you to switch between store profiles and the head office profile without restarting the computer. |
1.Save the SpeedLine Data folders from the locations you want to profile on your head office system hard drive. 2.Rename the data folders to Data.StoreName or Data.Store# for easy identification. For example, "Data.NewYork" or "Data.22341." 3.Copy the renamed folders and paste them into the C:\SpeedLine folder. 4.In Store Manager, on the Above Store menu, click Manage Profiles. 5.Click the Add button.  6.In the Name field, enter the store name. 7.Click the Path field, and then click the Browse button.  8.Browse to the C:\SpeedLine folder, select the data folder for the store, and click OK. 9.Click OK. The profile is now available for loading into Store Manager using the Switch Between Store Profiles procedure below. |
1.On the Above Store menu, click Manage Profiles. 2.Click the profile name to select it. 3.Click the delete button.  4.Click OK to confirm the deletion.

|
Note Deleting Profile entries in the Manage Profiles window will not delete the corresponding Data folder.
|
|
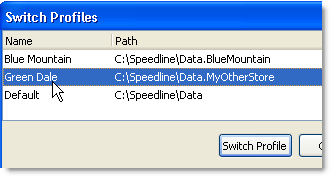
1.Under the Above Store menu, click Switch Profiles. 2.Select the profile you wish to switch to, and then click the Switch Profile button. (Depending on your station configuration options, you may be asked to log in to Store Manager again.) The currently-loaded profile name will appear in Store Manager’s title bar at the top of the window.

|
Note If you exit Store Manager while a custom profile is loaded, that profile will remain in effect, and its settings will be used in Terminal if Terminal is started or refreshed. If you want to switch back to the default profile, click Switch Profiles again, or restart the computer.
|
|
See Also:
•Set Up Stores and Store Groups
•Multi-Store Administration
•Install Above Store


