
Use the instructions below to customize each type of tender accepted by your store.
To Add or Change a Tender Type
|
Caution To avoid possible problems with existing tickets, do not make changes to tender type settings during the day. Changes are best made after running day end, or before making sales the next day. |

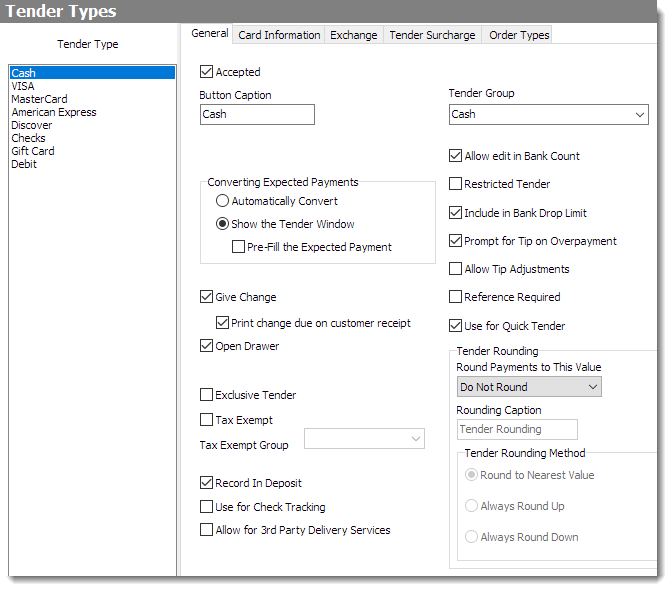
1.Go to the Settings> Money> Tender Types ![]() > General tab.
> General tab.
2.Do one of the following:
•If adding a new tender type:
i)Click Add and then enter the name for the new tender type you want to accept.
ii)In the Button Caption field, type the name of the tender type as you want it to appear on a Terminal button.
-or-
•If changing a tender type, in the Tender Type list, click to select it.
3.Select the options for the selected tender type that apply. Click the settings in the image below to see a description of each.

4.Click the Display Order buttons  below the Tender Type list to change the display order of the tender type buttons on the Terminal Tender screen.
5.If setting up a card payment type that will be integrated with SpeedLine, enter the Card Processing settings.
6.On the Edit menu, click Save Changes.
7.Refresh Terminal to implement your new settings.
To Deactivate a Tender Type
1.Go to the Settings> Money> Tender Types ![]() > General tab.
> General tab.
2.In the Tender Type list, click to select the order type you will no longer accept.
|
Caution Deactivating a tender type during the day may result in loss of data if that tender type has been used for the current day's sales. Deactivate tender types only after running day end, or before making sales the next day. |
3.Clear the Accepted checkbox. The tender type will no longer appear in Terminal.
See also:
•Create Foreign Currency Tender Button
•Add Surcharges for Tender Types
