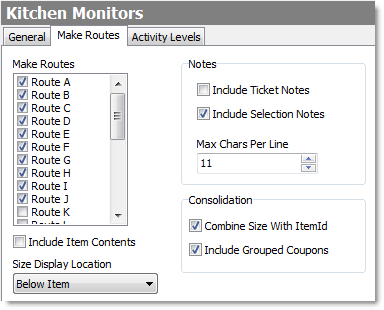
Follow the instructions in this topic to select make routes to send to the QSR kitchen display system, and to format the display of items on the kitchen monitors.

To Assign Kitchen Monitor Make Routes
1.Go to the Settings> Hardware> Kitchen Monitors ![]() > Make Routes tab.
> Make Routes tab.
2.In the Make Routes list, select the check boxes beside the make routes to send to the kitchen displays. For example, if you do not wish drinks to appear on the monitors, do not select the drinks make route.
3.To show item contents (ingredients) on the monitors, select the Include Item Contents check box.
|
Note For item contents to display, they must be entered in Menu Designer, and the Print on Ticket check box must be selected on the Contents tab. See Print Recipes on Tickets or Show on Displays for more information. |
4.From the Size Display Location list, select a display location for the item size, relative to the item name. Use Below Item to provide the maximum amount of space for the item name on-screen.
5.Under Notes, select the types of notes Ticket notes appear when an order-taker touches the Notes button on the Terminal Full Review screen. These notes generally apply to the entire order, and not just one item, for example, "Bring change for a $50." Selection notes appear when an order-taker touches the Notes button on a Terminal menu screen. These notes will apply to one menu item, for example, "Well Done." you want to include on the display. To prevent selection notes from being truncated, Max Chars Per Line should be set to 11 for four columns, 8 for five columns, or 5 for six columns. (Only the first two lines of selection notes will be sent from Terminal to the kitchen monitor software.)
|
Important Using Ticket Notes requires some extra configuration in the QSR software: In CSK or KDS Builder Pro, under Core Settings, click Routing Categories. All categories that you want Ticket Notes to appear on must include department number 26. To add the department: select the routing category; in the Department Numbers field, after the existing number, type a comma and then 26. Example: to attach ticket notes to make route "A" items, the Department Numbers field should read: 1,26. |
5.Under Consolidation, select Combine Size With ItemId if you use the CSK or KDS summary tables, and have set the Size Display Location to Above Item or Beside Item in step 4.
6.Select Include Grouped Coupons to display a coupon's name grouped together with the items it applies to.
|
Note For the coupon name and items to appear together with their coupon name, the Group Selections with Coupon option must be selected on the coupon's General tab in Menu Designer. |
7.On the Edit menu, click Save Changes.
8.Refresh Terminal on all stations to implement your new settings.
Also complete this topic to set up your KDS system:
•Enter Kitchen Monitor General Settings
See Also:
•Set Kitchen Monitor Activity Levels

