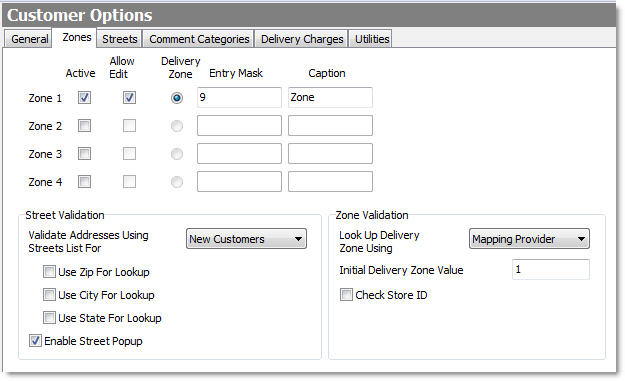
If your store uses delivery zones, use this procedure to add a delivery zone field to the Terminal Customer screen.
The delivery zone information shown on the Terminal Customer screen will match the zone information entered on the Store Manager Delivery Zones screen. The Delivery Zone field may be filled in manually by the order-taker, who enters a number from a map when the customer's address is entered, or automatically using LiveMaps [The LiveMaps optional add-on allows you to base your customer address validation, delivery zones, driving directions, and reporting on live, up-to-date maps provided by an online mapping provider. Display maps on a second monitor, email directions to your drivers' smartphones, and more. Talk to your SpeedLine Sales representative for more information.] or a streets database, which assign a zone to customers based on their street address. See the LiveMaps SpeedStart Tutorial or Manage the Streets Table for more information.
To Add a Delivery Zone Field to the Terminal Customer Screen
1.Go to the Settings> People> Customer Options ![]() > Zones tab.
> Zones tab.
2.Select the Active check box beside the delivery zone (usually Zone 1) to allow it to appear on the Terminal Customer screen.
3.To allow your employees to add or change the delivery zone in Terminal, select the Allow Edit check box beside the zone.
4.Select the Delivery Zone option. The delivery zone information shown on the Terminal Customer screen will match the zone information entered on the Store Manager Delivery Zones screen. The Delivery Zone field may be filled in manually by the order-taker, who refers to a map to determine the zone when they enter the customer's address, or may be filled in automatically by using information from the Streets Table. For more information see Delivery Zones and Manage the Streets Table.
|
Note Only one customer screen zone field can be designated a delivery zone. |
5.To constrain how information is entered into the delivery zone field, in the Entry Mask field, enter entry mask characters. The number of characters entered into this field determines the number that can be entered in Terminal (to a maximum of 10 characters). See mask descriptions and examples.
6.In the Caption field, enter the caption (maximum 10 characters) that will appear to the left of the field in Terminal (for example, "Del. Zone").
7.Change the street or zone validation settings as required. Click the settings in the image at the top of this topic to see a description of each, or see Change Street or Zone Validation.
9.On the Edit menu, click Save Changes.
|
Note To use delivery zones, you must also add the zones and specify times and charges on the Delivery Zones screen. See Manage Delivery Zones for instructions. |
10.Refresh all Terminal stations to implement your new delivery zone settings.
|
Hint The Customers by Zone report can list customers and their order information based on the delivery zone. |
See Also:
•Change Street or Zone Validation
•Add or Change Delivery Charges
•Add Custom Fields to the Customer Screen - to add a custom field (zone) that is not a delivery zone.


